
News
Bikes and crafts: Easy DIY handlebar bag
•
1 min read
Image

This month, we welcome our new guest contributor, Jessie Kwak! You might know Jessie's awesome blog, Bicitoro: bikes and craft. She's also going to be demoing projects in the Cascade booth at the Seattle Bike Expo on March 9 and 10. You can follow her on Twitter at @bicitoro.
Easy DIY handlebar bag
Months ago, I promised a friend that I'd make her a handlebar bag for her bike. The project has been simmering for a while, mostly because I never felt like I had time to tackle drafting and sewing a bag from scratch. I made a few sketches, but that was about it.
That is, until crafty bike blogger @ibikeubike mentioned her awesome idea: just sew some Velcro loops on the back of a pre-made purse. Genius.
I modified her method a bit to include D rings for adjustability. What we've got here is a super-simple DIY craft that's a good way to add some style to your bike. Use a bag you already own, or go pick up something fun at Goodwill—it works just as well for a guy or gal, depending on what type of bag you find.
 You'll need:
 Step 2: Attach the straps
Decide on the placement. The D ring end of the Velcro strap should be 2" below the top of the purse/bag, and straps should be placed as far to the sides as is possible to sew them. Keep in mind that if you're using a sewing machine you'll probably have to move them a bit more to the center in order to stitch it.
Step 2: Attach the straps
Decide on the placement. The D ring end of the Velcro strap should be 2" below the top of the purse/bag, and straps should be placed as far to the sides as is possible to sew them. Keep in mind that if you're using a sewing machine you'll probably have to move them a bit more to the center in order to stitch it.
 Pin them in place, FUZZY SIDE UP. If you're having trouble pinning—because of the fabric, or just an awkward angle—use glue or Stitch Witchery tape to hold the straps.
 Now's a good time to test your straps. Try putting your bag on your bike just to make sure everything's going as planned.
Stitch the straps in place, tacking them just above the D ring, and just below the top of the purse/bag. I used a straight stitch, and then a zig zag over the top of it in order to really hold it down. They're going to be under a lot of stress, so don't skip on the stitching.
Now's a good time to test your straps. Try putting your bag on your bike just to make sure everything's going as planned.
Stitch the straps in place, tacking them just above the D ring, and just below the top of the purse/bag. I used a straight stitch, and then a zig zag over the top of it in order to really hold it down. They're going to be under a lot of stress, so don't skip on the stitching.
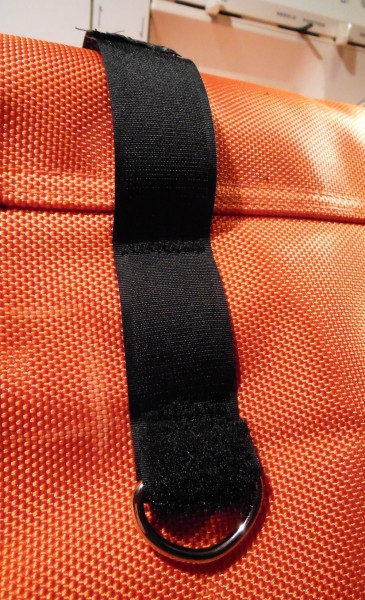 Step 3: Finishing
Trim about an inch off the hook end of your strap, then fold it under 1/4" (hook side in) and stitch that down. This not only makes it easier to thread through the D ring without snagging, it also gives you a convenient tab to pull on.
Step 3: Finishing
Trim about an inch off the hook end of your strap, then fold it under 1/4" (hook side in) and stitch that down. This not only makes it easier to thread through the D ring without snagging, it also gives you a convenient tab to pull on.
 Put it on your bike—you're good to go!

Image
- * A medium-sized purse/bag
- * 12" of hook and loop Velcro
- * 2 D rings
- * A sewing machine (you could hand-sew it, but a machine stitch will be more durable)
Image
Image
Image
Image
Image
Image
Share this post